
Perfect corner detailing is the single biggest factor that prevents costly client callbacks and protects your project margins. While flat surfaces are straightforward, corners are where flexible stone projects either succeed or fail. A poorly executed seam or a raw, exposed edge can compromise the entire installation, forcing your team into non-billable rework and damaging your reputation for quality craftsmanship.
This guide provides a clear, operational breakdown of the three primary methods for finishing flexible stone corners. We will cover the heat-and-bend technique for a seamless finish, the butt-joint method for speed and simplicity, and the miter cut for sharp, precise angles. We’ll also explain how to use touch-up paint for exposed edges to ensure a professional result every time.
Why Corners are the Hardest Part
Corners fail not because of material defects, but due to systemic issues in coordination, scheduling, and undervaluing precision, making them the leading source of on-site rework and budget overruns.
Coordination Complexity
Corners are a critical bottleneck where multiple trades converge. Any breakdown in communication between architects, engineers, and detailers leads to misalignments that are only discovered during installation. These field-level clashes trigger costly delays and disputes, turning a simple connection point into a project liability.
- Multiple specialized teams must coordinate perfectly to ensure a seamless fit.
- While 3D modeling helps identify major issues, it doesn’t replace clear communication on execution details.
- Mistakes found on-site are exponentially more expensive to fix than those caught during the design phase.
Timeline and Design Pressures
Compressed project schedules and late-stage design changes force teams to rush the detailing work for complex areas. This pressure prioritizes speed over precision, making corners exceptionally prone to errors. Detailing is often treated as a cost to be cut rather than a value-added service that prevents expensive field issues.
- Detailing is frequently undervalued in project budgets, leading to rushed or incomplete specifications.
- Last-minute design changes can invalidate carefully planned corner executions, forcing improvisations on-site.
- Insufficient time for precise installation leads directly to rework and structural compromises.
The High Cost of Rework
Imprecise corner installation results in rework that goes far beyond a simple fix. These mistakes can compromise the entire wall’s aesthetic and structural integrity, leading to significant cost overruns. Projects that invest in quality detailing from the start consistently demonstrate superior outcomes and lower total costs.
- Fixing one poorly executed corner often requires undoing and redoing large sections of adjacent work.
- On-site fixes create a ripple effect, causing further delays for other trades waiting on the completed work.
- The highest-performing projects treat detailing as a non-negotiable part of the planning process.
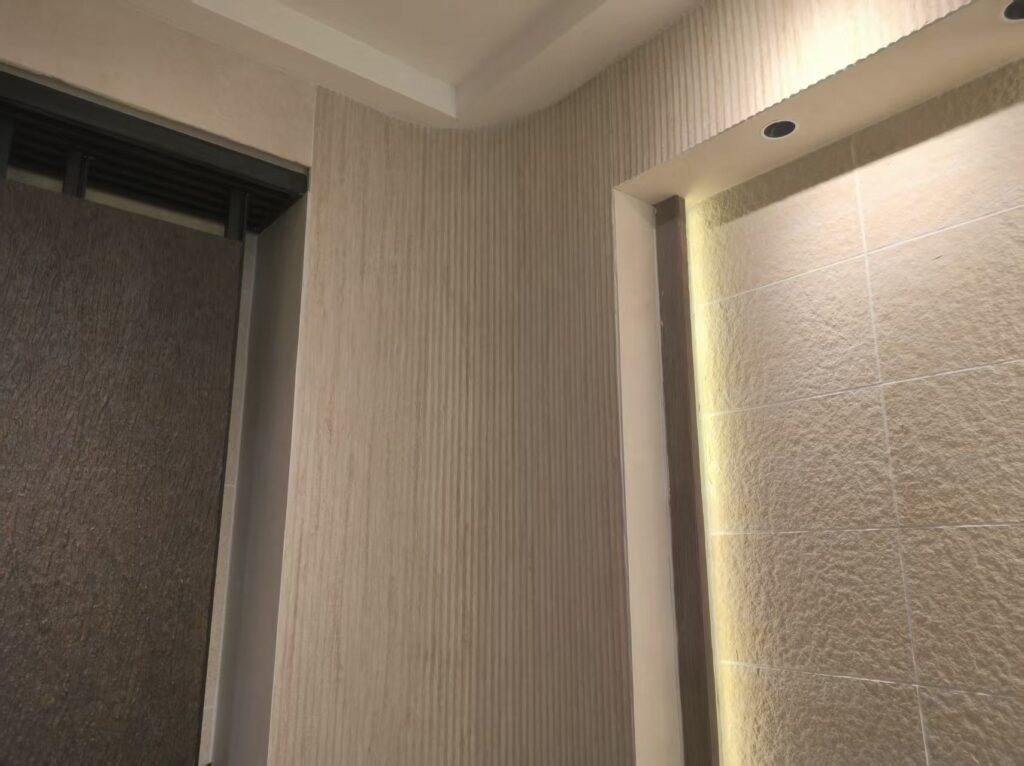
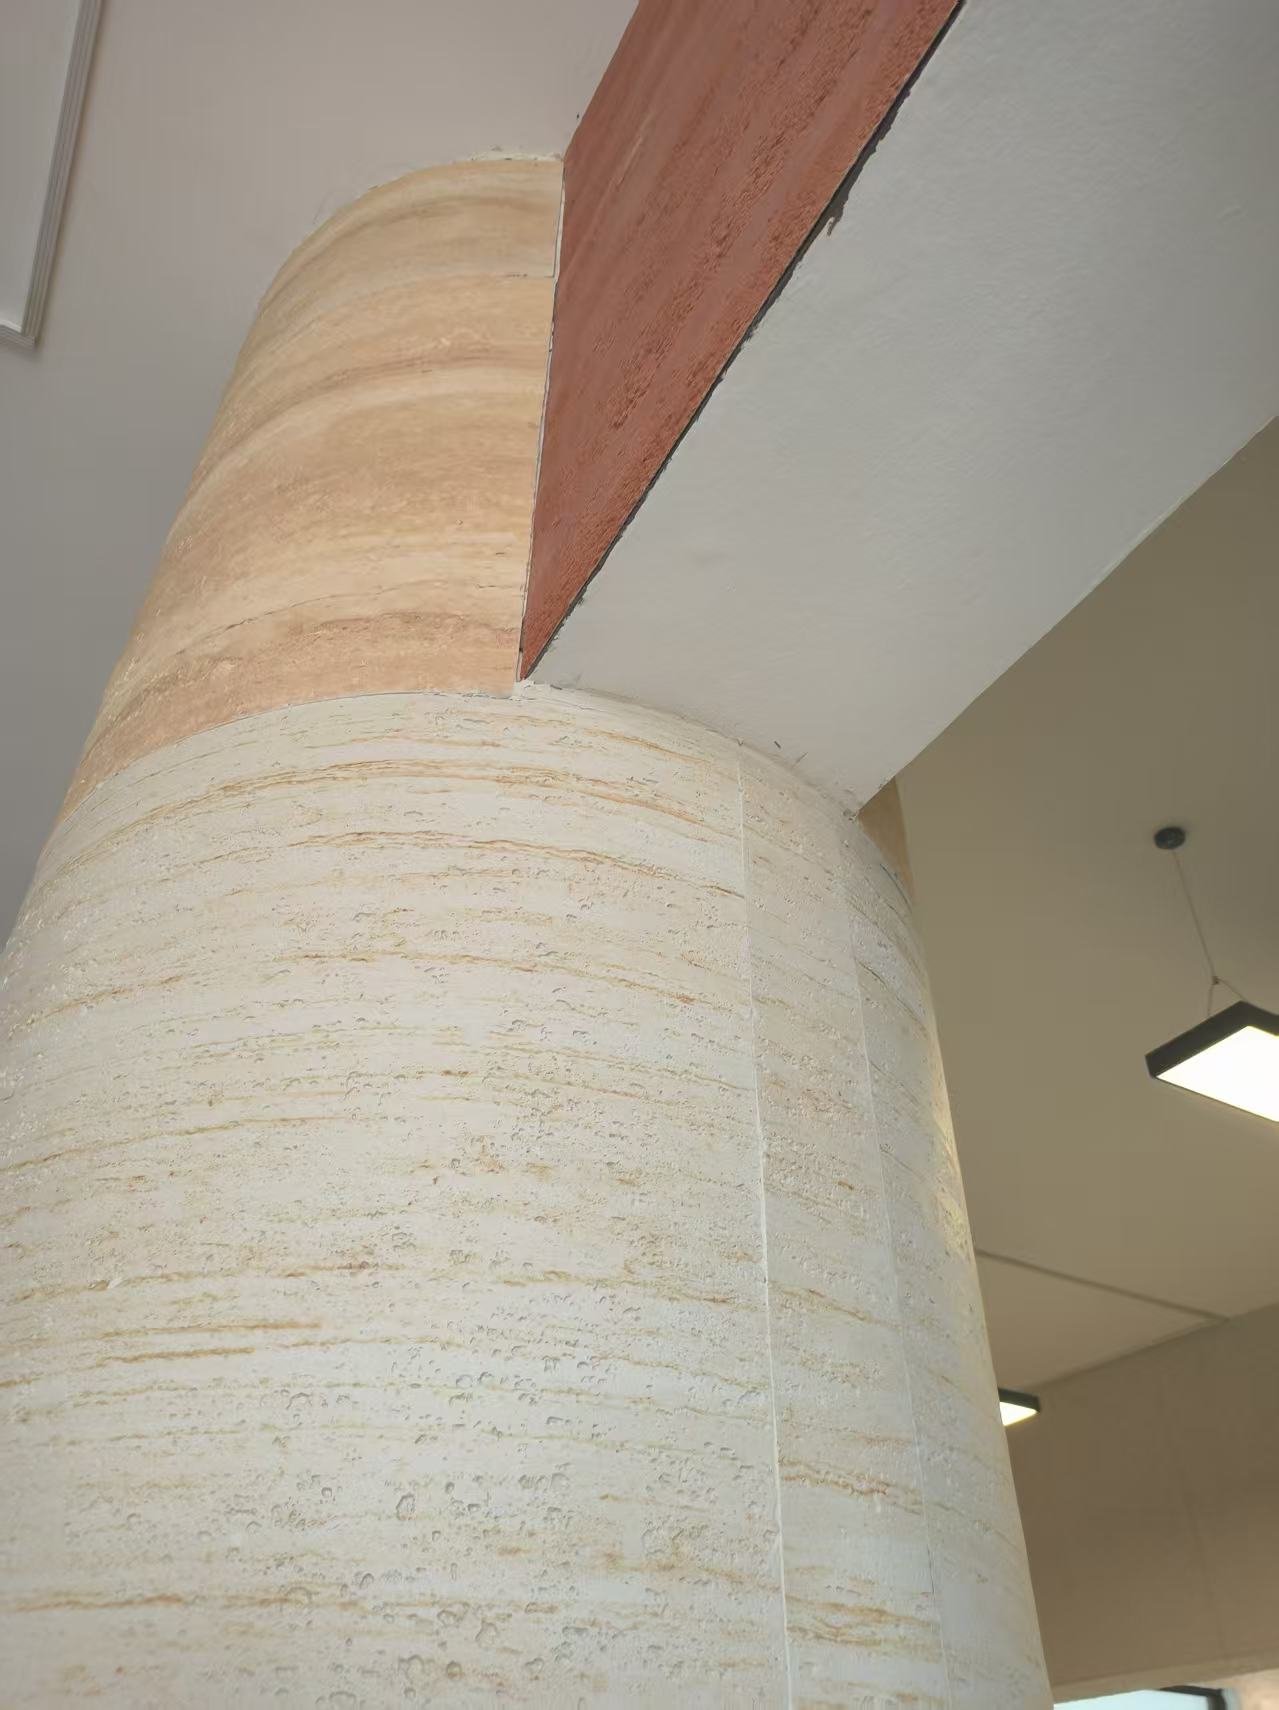
Method 1: Heat & Bend (The Seamless Corner)
The heat and bend method uses controlled thermal softening to form a continuous, joint-free corner, delivering the superior aesthetics and waterproofing critical for high-end architectural applications.
How Thermal Bending Works
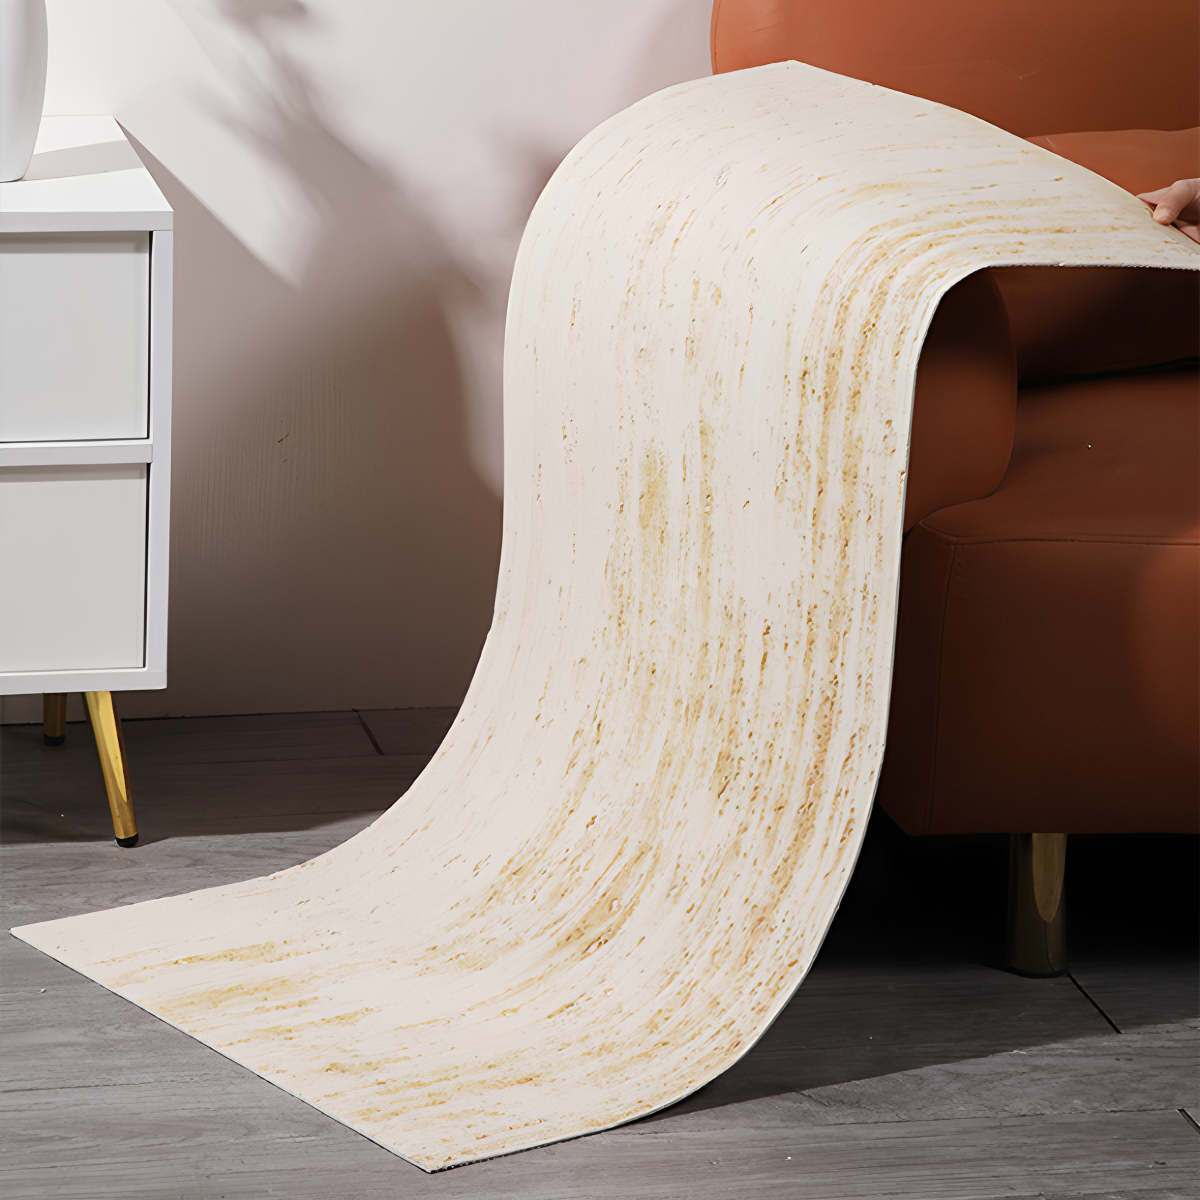
This technique involves applying a heat gun to the fiberglass and resin backing of the flexible stone panel. The controlled heat makes the panel pliable enough to bend around a 90-degree corner without cracking or stressing the stone face. This process creates a continuous stone surface that looks like a single, solid piece custom-cut for the space. The material is formed while hot and then holds its new shape permanently once it cools, locking in the bend.
- Controlled heat is always applied to the panel’s backing, never directly to the stone face.
- The goal is to achieve temporary flexibility for shaping, not to alter the material’s core properties.
- Once cooled, the panel regains its full rigidity and holds the corner’s shape permanently.
Tools and Preparation
Success with this method depends entirely on precise temperature control. A variable-temperature heat gun is not optional; it’s the primary tool that prevents overheating, which can damage the panel’s backing or compromise the bond. Proper preparation ensures both safety and a high-quality finish.
| Cornering Technique | Key Characteristic | Ideal Use Case |
|---|---|---|
| Heat & Bend (Seamless) | Monolithic, continuous surface with no grout line. | Curved walls, columns, waterproof areas, high-end retail spaces. |
| Butt Joint & Sanding | Fastest method; visible seam requires filling and touch-ups. | Utility areas, budget-sensitive projects, internal corners. |
| Miter Cut (45°) | Sharp, precise 90° angle; requires precision tools. | Cabinetry, feature walls, geometric architectural details. |
- An industrial heat gun with an adjustable temperature dial is essential.
- Always use heat-resistant gloves to handle the panel during shaping.
- A small, hard roller helps press the softened panel firmly into the corner for a tight, professional fit.
Key Advantages of a Seamless Corner
The primary benefit of this method is its superior aesthetic and functional quality. It completely eliminates the need for grout lines or visible joints at the corner. This not only produces a clean, high-end look but also enhances the installation’s durability by removing a common point of water ingress or failure.
- Creates a truly continuous, uninterrupted stone appearance that mimics solid slab construction.
- Improves waterproofing performance by removing a potential point of failure at the seam.
- Ideal for high-visibility areas like reception desks, wrapped columns, and storefront feature walls.
Unleash Design Freedom with Flexible Stone
Method 2: Butt Joint & Sanding
A butt joint is the fastest way to form a corner by placing one panel edge directly against another, but its final appearance relies entirely on perfectly straight cuts and the strength of the structural adhesive.
Best Use Cases for Butt Joints
The butt joint is the most direct and rapid method for creating corners. Installers choose this technique for projects where speed is the primary driver, like large-scale commercial renovations or shopfitting projects on compressed timelines. It involves pushing the square-cut edge of one flexible stone panel directly against the edge of the adjacent one. While simple, the joint’s integrity and aesthetic success depend almost completely on the performance of modern structural adhesives to create a strong, lasting bond. This approach works well for creating long, continuous surfaces where minimizing installation time is a key project goal.
| Corner Method | Best For | Key Consideration |
|---|---|---|
| Heat & Bend | Exterior corners, columns, high-end aesthetics | Creates a completely seamless, monolithic look. |
| Butt Joint | Interior corners, rapid installations, flat surfaces | Fastest method, but the seam remains visible. |
| Miter Cut | Feature walls, fireplaces, detailed trim work | Requires precision cutting for a sharp, clean seam. |
Edge Preparation and Assembly
A clean result starts with a perfect cut. Use a sharp utility knife and a straightedge to ensure both panel edges are perfectly straight and free of debris. Any imperfection in the cut will translate into a visible gap at the seam. Apply a consistent bead of structural adhesive to the substrate or the back of the panels. Firmly press the two panels together, ensuring their faces are flush and the edges are tight. Wipe away any adhesive that squeezes out immediately, then secure the joint until the adhesive achieves its initial cure.
Sanding for a Seamless Finish
Sanding is the final step to clean up the joint line. After the adhesive has fully hardened—check the manufacturer’s specified cure time—you can address the seam. For flexible stone, this process is less about abrading the panel surface and more about removing any dried adhesive residue. Use a fine-grit sanding block to gently smooth the area along the seam. This light sanding removes any roughness from the cured glue and helps blend the transition, creating a cleaner, more professional finish.
Method 3: Miter Cut (45 Degree)
A 45-degree miter cut delivers the sharpest, most architecturally precise corner available, but it requires the right equipment and leaves no room for cutting errors.
Tools and Preparation
This method creates a sharp, professional corner by cutting two panel edges at 45-degree angles. It requires precise tools to ensure the cuts are clean, especially with the composite nature of flexible stone panels. Use a miter saw or a table saw equipped with a fine-toothed blade suitable for composites to avoid chipping the thin stone layer. Before making any cuts, set the blade angle precisely to 45 degrees and secure the panel firmly to a stable work surface to prevent vibration or movement during the cut.
| Tooling Specification | Miter/Table Saw (Professional Standard) | Jigsaw/Hand Saw (Not Recommended) |
|---|---|---|
| Angle Precision | High; the angle is mechanically locked at exactly 45°. | Low; relies entirely on user stability and is prone to drift. |
| Edge Finish | Clean cut with minimal chipping on the stone surface. | Rough edge with a high risk of tearing or delaminating the material. |
| Project Scalability | Excellent for creating multiple, perfectly identical corners. | Poor; results in high inconsistency between cuts and costly rework. |
Cutting the Panels
Accurate marking and a steady cutting technique are essential for a perfect mitered corner. The goal is to create two edges that will meet seamlessly to form a 90-degree angle. Measure and mark the cut line on both panels that will form the corner. Always perform a slow, consistent cut to ensure a smooth edge and prevent damage to the stone veneer. A critical step is to cut with the decorative stone face up, which directs any potential chipping towards the back of the panel, keeping the visible surface pristine.
Assembling the Corner
After cutting, the two panels are ready to be joined. A dry fit is crucial to verify the alignment before applying any permanent adhesive. Test-fit the two 45-degree panels to confirm they form a tight 90-degree corner without any visible gaps. Once confirmed, apply a quality construction adhesive to the back of both panels and press them firmly onto the wall substrate. To guarantee a tight seam while the adhesive cures, apply strips of painter’s tape across the joint every few inches. This tape acts as a temporary clamp, holding the two pieces tightly together for a flawless finish.
Touch-up Paint for Exposed Edges
Achieving a durable, seamless finish on exposed panel edges hinges on a systematic approach: high-precision digital color matching, material-specific paint formulations, and rigorous surface preparation.
Digital Color Matching Systems
Modern touch-up systems depend on digital color matching to get a seamless repair on exposed panel edges. This technology delivers high-fidelity results, blending new paint with the original factory finish. With current systems achieving up to 98% color accuracy across different material and paint types, they remove the manual guesswork that often leads to inconsistent outcomes.
Specialized Paint Formulations
Generic paint is no longer sufficient for professional repairs. The industry now uses specialized formulations engineered for specific substrates and environmental conditions.
- Material-Specific Formulas: Coatings are engineered for substrates like aluminum or complex multilayer paint systems, ensuring proper adhesion and durability.
- Eco-Friendly Variants: Water-borne paints are increasingly specified to comply with sustainability standards without compromising performance.
- Application-Specific Coatings: Development includes proprietary formulas, such as low-conductivity coatings designed for panels near sensitive electronic equipment.
Importance of Surface Preparation
The final quality of a touch-up job depends directly on surface preparation. Without proper pretreatment of the exposed substrate, even the best paint will fail to adhere correctly, resulting in a poor finish and reduced durability. Data shows that many DIY applications fail precisely because of improper surface prep, which underscores the need for professional-grade techniques to ensure a lasting repair.
Conclusion
Mastering corners is the key to a professional flexible stone installation. Whether you choose the seamless look of a heat-bent corner, the simplicity of a butt joint, or the precision of a miter cut, the right technique ensures a durable and clean finish. Each method offers a different balance of aesthetics and installation speed, allowing you to adapt to any project requirement.
If you are planning a project, consider which corner method best fits your design. Our team is available to provide project-specific guidance or send material samples for mock-ups.
Frequently Asked Questions
How to install stone veneer corners?
For a professional installation, always begin at the corners. First, ensure the substrate is clean, dry, and structurally sound. Apply a polymer-modified mortar or construction adhesive to the back of the corner piece. Press the piece firmly onto the corner, wiggling it slightly to set it into the mortar. It’s standard practice to alternate the long and short ends of the corner pieces as you move up the wall to create a natural, interlocking pattern. Once corners are set, you can begin installing the flat panels, working from the corners inward.
Bending flexible stone?
Flexible stone veneer panels can be bent to fit curved surfaces or outside corners. The process requires a heat gun to gently warm the panel’s polymer or fiberglass backing. Apply low, even heat across the area you intend to bend. As the panel becomes pliable, carefully shape it around the curve. Hold it securely in place against the adhesive until it cools and hardens into its new form. Always consult the manufacturer’s specific guidelines for the recommended temperature range to avoid overheating, which can cause delamination or discoloration.
Stone veneer corner pieces?
Most stone veneer systems offer purpose-built corner pieces to ensure a seamless and authentic look. The two primary types are L-shaped (or quoin) corners and two-piece interlocking corners. L-shaped corners are single, pre-formed units that wrap around a 90-degree angle, offering fast installation. Two-piece systems consist of separate stones with alternating long and short returns that are woven together during installation, perfectly mimicking traditional masonry techniques. The availability of a specific type depends on the product line and stone style.
Mitered corner installation?
A mitered corner is an advanced technique used when pre-made corner pieces are not available or a sharp, modern finish is desired. It involves cutting two flat stone panels at precise 45-degree angles using a wet saw equipped with a high-quality diamond blade. Apply adhesive to both the substrate and the mitered edges of each panel. Carefully join the two pieces to form a clean 90-degree corner, ensuring the faces are perfectly flush. Use painter’s tape to hold the joint securely while the adhesive cures. The seam can then be filled with a color-matched sanded caulk or epoxy for a monolithic appearance.
Finishing edges of stone panels?
Exposed edges of stone veneer panels, such as at wall terminations or around windows, require a clean finish. The premium method is to create a “return” by mitering a small strip of the same veneer and adhering it to the edge, giving the illusion of a solid stone block. A simpler, common alternative is to apply a bead of high-quality, color-matched sanded caulk for a neat, sealed edge. For a contemporary look, dedicated metal or PVC trim pieces (often L-shaped or U-channel) can be installed to cap the raw edge, providing both protection and a sharp design element.