

Eine erfolgreiche Installation einer gebogenen Wand ist oft das Einzige, was zwischen einem rentablen Projekt und einem Müllcontainer voller rissiger, delaminierter Steinverblendungen steht. Architekten geben ehrgeizige Kurven vor, aber die Installateure tragen das Risiko, indem sie die Vision des Kunden gegen die physikalischen Grenzen des Materials abwägen.
Eine Fehlkalkulation beim Biegeradius oder bei der Wahl des Klebstoffs kann zu kostspieligen Nacharbeiten, Projektverzögerungen und einem beschädigten Ruf führen. Es geht nicht nur um Ästhetik, sondern auch darum, Rückrufe zu vermeiden, die Ihre Gewinnspanne zunichte machen.
Dieses Handbuch enthält die Standardarbeitsanweisungen für das fehlerfreie Verkleiden komplexer Radien. Wir behandeln die kritischen technischen Entscheidungspunkte, beginnend mit der Bestimmung des absoluten Mindestbiegeradius für Ihr Material.
Sie lernen den Unterschied zwischen vertikaler und horizontaler Maserung, die spezifischen Szenarien für die Verwendung von Kontaktzement im Vergleich zu Mörtel und die richtigen Umreifungsmethoden, um die Platten während der Aushärtung sicher zu halten. Wir erläutern auch das Verfahren zur Herstellung sauberer, nahtloser vertikaler Fugen an Säulen für ein makelloses Finish.
Bestimmen des Grenzradius
Die Industrie ist von der komplexen Geometrie vor Ort zu standardisierten Herstellertabellen und digitalen Rechnern übergegangen, um die Biegegrenzen von Materialien schneller und zuverlässiger zu bestimmen.
Die korrekte Bestimmung des minimalen Biegeradius ist entscheidend für eine rissfreie Verlegung auf gekrümmten Oberflächen. Eine zu aggressive Biegung belastet das Material, was zu Rissen und zum Versagen des Projekts führen kann. Die moderne Verlegung stützt sich auf einige bewährte Methoden, um diese Grenzen zu bestimmen und sowohl die Integrität der Konstruktion als auch die Langlebigkeit des Materials zu gewährleisten.
Verwendung von Hersteller-Referenztabellen
Der direkteste Weg ist die Konsultation des technischen Datenblatts des Herstellers. Vorberechnete Referenztabellen liefern standardisierte, geprüfte Radiusdaten für bestimmte Produktlinien und Materialstärken. Diese Vorgehensweise macht Rätselraten und komplexe Berechnungen vor Ort für Standardkonstruktionen überflüssig. Durch die Verwendung dieser Tabellen wird sichergestellt, dass die Installation perfekt mit den spezifizierten Fähigkeiten des Materials übereinstimmt, wodurch die strukturelle Genauigkeit und die Einhaltung der Garantie gewährleistet werden.
Kombination von Diagrammen mit Feldmessungen
Bei kundenspezifischen Projekten oder nicht standardisierten Substraten ist ein Hybridmodell effektiver. Bei dieser Methode werden zunächst die Daten des Herstellers als Grundlage verwendet und dann durch Messungen vor Ort überprüft. Die Verwendung praktischer Werkzeuge und grundlegender geometrischer Formeln ermöglicht es den Verlegern, die vorausberechneten Daten mit den tatsächlichen Bedingungen vor Ort zu vergleichen. Dieser ausgewogene Ansatz ist für einzigartige architektonische Merkmale unerlässlich und ermöglicht präzise Anpassungen, um Unregelmäßigkeiten in der Realität auszugleichen.
| Methode | Primärer Anwendungsfall | Hauptvorteil |
|---|---|---|
| JMS Decor MCM Datenblatt | Direkte Spezifikation für unsere flexiblen Steinplatten. | Definitive, geprüfte Grenze (≈200mm biegbarer Durchmesser) für rissfreie Kurven. |
| Allgemeine Hersteller-Tabellen | Standard-Blockwände und nicht kundenspezifische Projekte. | Reduziert die Anzahl der Feldberechnungen und gewährleistet eine breite Konsistenz. |
| Geometrische Berechnungen vor Ort | Kundenspezifische architektonische Merkmale oder Datenüberprüfung. | Höchste Genauigkeit, zugeschnitten auf die jeweiligen Standortbedingungen. |
Nutzung digitaler Tools und Rechner
Die Einführung digitaler Werkzeuge und vereinfachter Arbeitsblätter macht die Radiusbestimmung für Installateure aller Qualifikationsstufen zugänglich. Diese Rechner automatisieren die geometrischen Formeln und erfordern nur wenige einfache Eingaben, um eine genaue Radiusmessung zu erhalten. Dieser Ansatz strafft den Planungsprozess, spart wertvolle Zeit auf der Baustelle und reduziert das Potenzial für manuelle Berechnungsfehler, die ein Projekt gefährden können, erheblich.
Vertikales vs. horizontales Grain Bending
Die natürliche Maserungsrichtung einer flexiblen Steinplatte ist der wichtigste Faktor, der den Mindestbiegeradius und die Integrität der Verlegung bestimmt.
Verständnis der Kornorientierung in flexiblem Stein
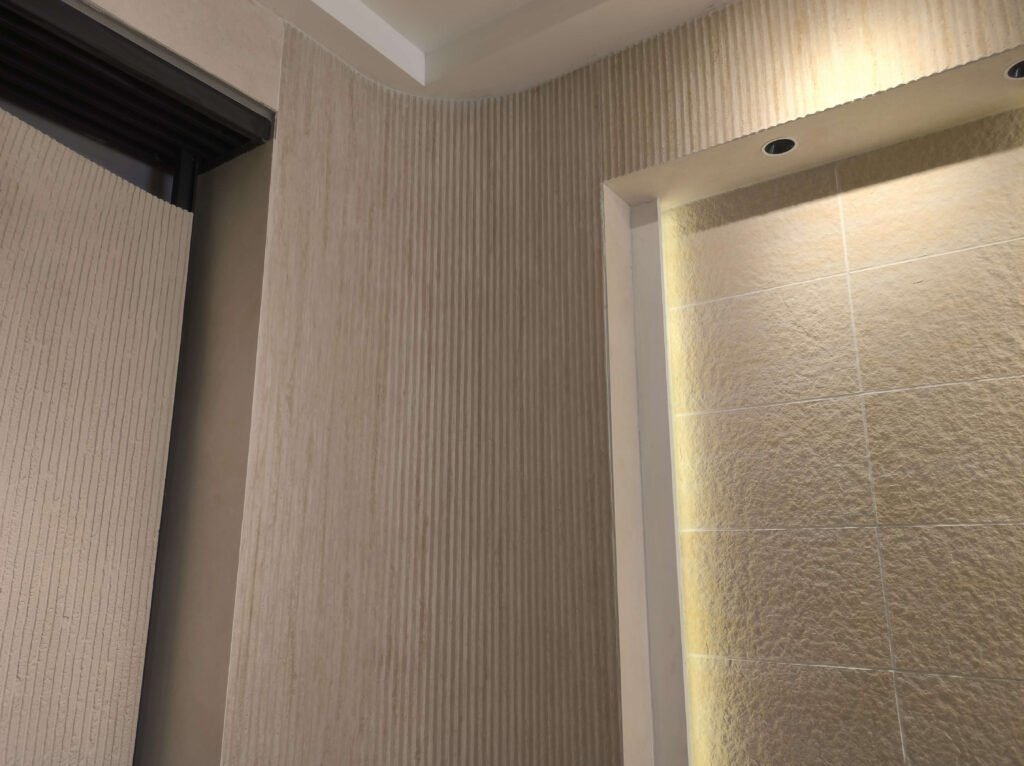
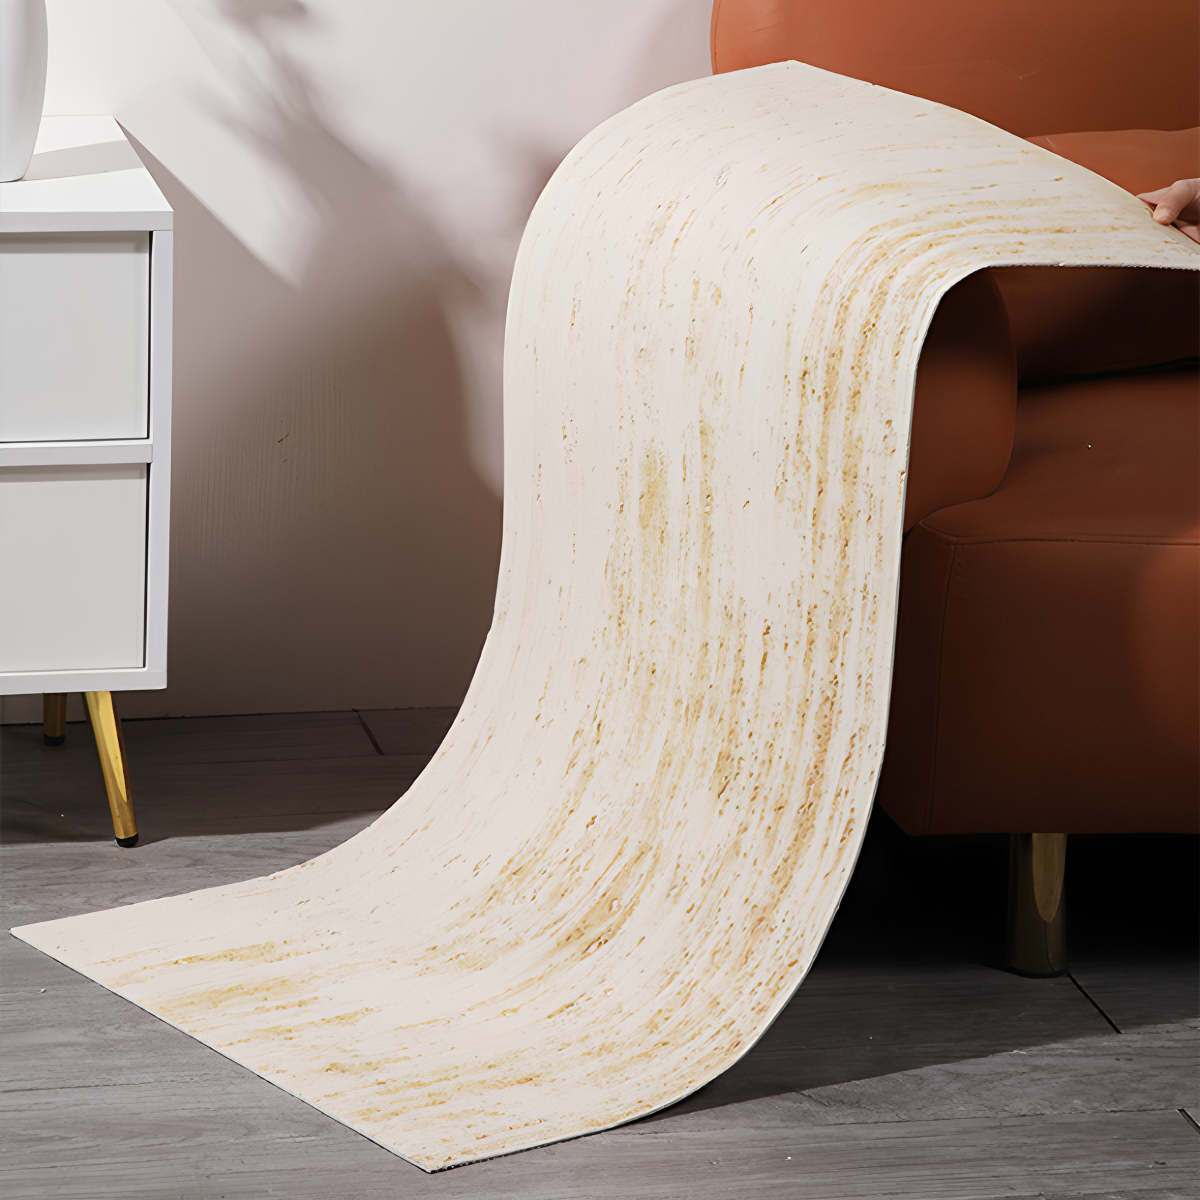
Die ‘Maserung’ in flexiblen Steinplatten bezieht sich auf die natürliche Richtung der Steinschichten und visuellen Muster, die in der Regel der Maserung innerhalb der Steinart, wie Schiefer oder Schiefer, folgt. Diese Ausrichtung bestimmt, wie sich die Platte biegen wird, was sich direkt auf die einfache Verlegung und das endgültige Aussehen auswirkt. Die Bestimmung der Maserungsrichtung ist ein wichtiger erster Schritt, um eine gebogene Oberfläche erfolgreich zu verlegen, ohne das Material zu beschädigen.
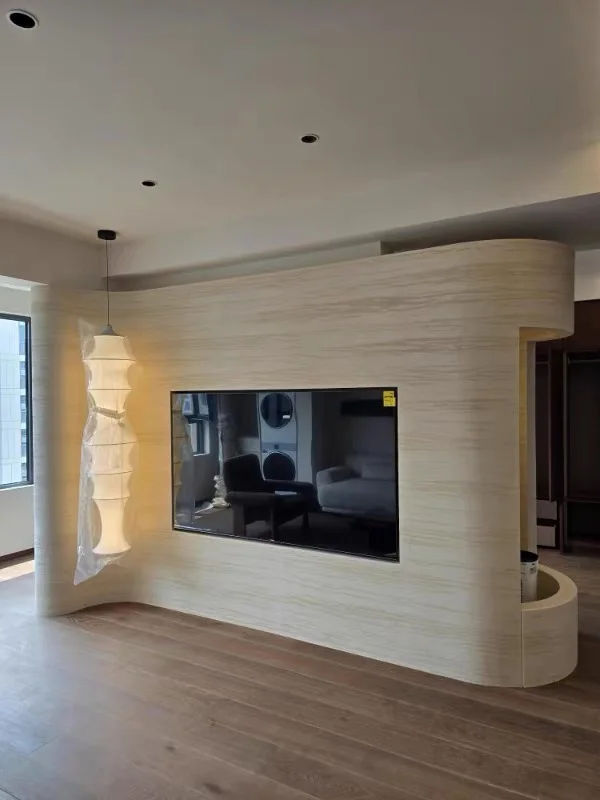
Biegen entlang der Maserung (vertikales Biegen)
Das Biegen einer Platte parallel zu ihrer Maserung ist die Standardmethode und wird für fast alle Anwendungen empfohlen. Dieser Ansatz nutzt die natürliche Flexibilität des Materials und minimiert die Belastung des Steins und seiner Unterlage während der Verlegung. Es ist die einzige Möglichkeit, die engstmöglichen Kurven zu erzielen, ohne Brüche oder Delaminationen zu riskieren.
- Ermöglicht die Anpassung der Platte an einen engeren Biegeradius ohne Rissbildung.
- Ideal zum Umwickeln von engen Säulen, Pfeilern und anderen Oberflächen mit einer scharfen konvexen Kurve.
- Das optische Muster des Steins fließt auf natürliche Weise um die Kurve und sorgt für eine nahtlose Ästhetik.
| Biegeparameter | Vertikales Biegen (entlang der Maserung) | Horizontale Biegung (gegen die Faserrichtung) |
|---|---|---|
| Minimaler Radius | Engerer Radius realisierbar (z.B. ≈ 200mm Durchmesser) | Erfordert einen deutlich größeren, stufenförmigen Radius |
| Materielle Belastung | Niedrig; arbeitet mit der natürlichen Flexibilität des Steins. | Hoch; übt Spannung auf die Steinschichten aus und erhöht das Bruchrisiko. |
| Empfohlener Anwendungsfall | Standard für Säulen, Pfeiler und scharfe konvexe Kurven. | Nur für sehr große, allmählich verlaufende Kurven oder besondere Designanforderungen. |
Biegen gegen den Strich (horizontales Biegen)
Das Biegen einer Platte senkrecht zu ihrer Maserung ist schwieriger und erfordert einen viel größeren Radius. Diese Ausrichtung übt eine erhebliche Spannung auf die Steinschichten aus und sollte nur dann versucht werden, wenn dies für ein bestimmtes Gestaltungsergebnis unbedingt erforderlich ist. Das Erzwingen einer engen Biegung gegen die Maserung ist die häufigste Ursache für Installationsfehler.
- Erhöht das Risiko von Spannungsbrüchen oder Delaminierung des Glasfaserträgers erheblich.
- Diese Methode eignet sich nur für sehr große, allmählich verlaufende Kurven, bei denen die Platte nicht unter erheblicher Spannung steht.
- Erfordert eine sorgfältige Projektplanung, um sicherzustellen, dass die Konstruktion die Biegebegrenzungen des Materials in dieser Richtung berücksichtigen kann.
Unbegrenztes Design mit flexiblem Stein
Klebstoff: Kontaktzement vs. Mörtel
Die Wahl zwischen Mörtel und einem modernen Kleber ist ein Kompromiss zwischen struktureller Tradition und Verlegegeschwindigkeit, der ganz vom Projektumfang, dem Zeitplan und dem Budget abhängt.
Traditioneller Mörtel für bauliche Projekte
Mörtel ist der etablierte Standard für großflächiges Mauerwerk. Seine hohe Druckfestigkeit, seine bewährte Langzeitbeständigkeit und seine niedrigen Stückkosten machen ihn zur einzigen praktischen Wahl für Fundamente, tragende Wände und großflächige Außenfassaden.
Bauunternehmen verlassen sich auf die vorhersehbare Leistung und die Kosteneffizienz bei großvolumigen Anwendungen. Die wichtigste betriebliche Einschränkung ist die 24-stündige Aushärtungszeit, die in den Projektzeitplan einbezogen werden muss, bevor die Struktur eine nennenswerte Last tragen kann.
Mauerkleber für Schnelligkeit und Finish
Moderne Mauerkleber sind auf Schnelligkeit und Präzision ausgelegt, insbesondere bei nicht-strukturellen oder dekorativen Anwendungen. Diese Formulierungen werden häufig bei kommerziellen Renovierungen, wie z. B. im Ladenbau oder bei der Modernisierung von Hotels, verwendet, wo eine möglichst kurze Ausfallzeit entscheidend ist. Ein Klebstoff härtet innerhalb von Minuten oder wenigen Stunden aus, nicht erst nach Tagen, und sorgt für eine viel stärkere Anfangshaftung oder Klebrigkeit.“
Dies ermöglicht eine schnellere und sauberere Verlegung von Furnieren, Paneelen und Reparaturarbeiten und sorgt für eine scharfe Ästhetik bei minimaler Unordnung. Für Projekte wie die Verlegung unseres MCM Flexible Stone wird ein hochwertiger Strukturkleber oder Fliesenkleber empfohlen, um eine sichere und effiziente Verbindung zu gewährleisten.
| Attribut | Traditioneller Mörtel | Moderner Mauerkleber |
|---|---|---|
| Aushärtungszeit | Ca. 24 Stunden | Minuten bis ein paar Stunden |
| Bester Anwendungsfall | Großflächige, tragende Strukturwände | Reparaturen, Zierfurniere, zeitkritische Projekte |
| Kostenprofil | Niedrige Kosten pro Einheit, wirtschaftlich bei großen Mengen | Hohe Kosten pro Einheit, praktisch für kleinere Flächen |
Auswahl anhand der Projektanforderungen

Die Entscheidung hängt von den Anforderungen der jeweiligen Aufgabe ab. Für jedes Projekt, bei dem die Verkleidung ein wesentlicher Bestandteil der strukturellen Integrität des Gebäudes ist, bleibt Mörtel die Standardwahl. Bei kleineren Reparaturen, Innenwänden oder schnellen Renovierungsarbeiten ist ein Spezialkleber jedoch oft die praktischere und letztlich rentablere Option. Die höheren Materialkosten für den Kleber werden durch die erheblich geringeren Arbeitsstunden und die kürzere Projektlaufzeit leicht ausgeglichen.
Verwendung von Gurten zum Halten des Steins während der Aushärtung
Bei gekrümmten Verlegungen sind Bänder die zuverlässigste Methode, um vor Ort einen gleichmäßigen Druck auszuüben, der sicherstellt, dass die flexible Steinplatte während des Aushärtens des Klebstoffs einen vollständigen Haftkontakt erreicht.
Zweck von Bändern in gebogenen Anlagen
Bei der Verlegung von flexiblen Steinplatten auf Flächen wie Säulen oder gewölbten Wänden dienen die Bänder als temporäre Klammern. Ihre Aufgabe ist es, gleichmäßigen Druck auf die gesamte Platte auszuüben und sie zu zwingen, sich dem Untergrund anzupassen, während der Kleber aushärtet. Dieser mechanische Druck ist entscheidend, um die natürliche Tendenz der Platte zu verhindern, sich aufzurichten, was dazu führen kann, dass sie sich von der Oberfläche abhebt oder wegzieht, bevor die Verbindung vollständig hergestellt ist.
- Sorgt für einen vollständigen Kontakt zwischen der Steinplatte und dem Klebstoff für eine sichere Verbindung.
- Ideal zum Halten von Platten an Säulen, konvexen oder konkaven Wänden.
- Die Bänder werden entfernt, sobald der Klebstoff gemäß der vom Hersteller angegebenen Zeitspanne vollständig ausgehärtet ist.
Anwendungstechniken und bewährte Praktiken
Die Verwendung von Spanngurten ist eine Technik, die von der Erfahrung des Verlegers abhängt, da es keine offiziellen Industrienormen für diese spezielle Methode gibt. Installateure verwenden in der Regel einstellbare Ratschenbänder oder Spannbänder, um die Platten effektiv zu befestigen. Das Ziel ist es, einen festen, gleichmäßigen Druck zu erzielen, ohne das Material zu beschädigen.
- Legen Sie ein weiches Material, z. B. Schaumstoff, Pappe oder ein schweres Tuch, zwischen den Gurt und die Steinoberfläche, um Kratzer oder Druckstellen zu vermeiden.
- Ziehen Sie die Platte gerade so fest an, dass sie fest auf dem Untergrund sitzt. Ein zu starkes Anziehen kann zu Rissen in der Platte oder zu Vertiefungen führen.
- Prüfen Sie während des Aushärtungsprozesses regelmäßig die Bandspannung, da sich das Material leicht verschieben oder setzen kann.
Alternative Methoden der vorübergehenden Unterstützung
Wenn keine Bänder zur Verfügung stehen oder diese für eine bestimmte Geometrie unpraktisch sind, können die Verleger andere Methoden anwenden, um die Platten während des Aushärtens zu sichern. Diese Alternativen können je nach Projektanforderungen sowohl für flache als auch für gekrümmte Oberflächen verwendet werden.
- Provisorische Verstrebungen aus Holz oder anderen starren Materialien können verkeilt werden, um die Platten gegen eine Oberfläche zu drücken.
- Strategische Platzierung von kleinen mechanischen Befestigungen an den Kanten, die später verdeckt oder entfernt werden können.
- Verwendung von schnell abbindenden Klebstoffen oder Strukturepoxiden, die schnell haften und die erforderliche Einspannzeit erheblich reduzieren.
Nahtlose vertikale Fugen an Säulen
Die Bauindustrie hat sich auf vorgefertigte, leistungsstarke Verbindungssysteme verlegt, um die strukturelle Integrität zu verbessern und die Projektlaufzeiten im modernen Stützenbau zu beschleunigen.
Moderne Fugensysteme
Bis 2026 wird der Arbeitsaufwand für den Bau von Säulen auf der Baustelle durch die Verwendung integrierter Verbindungssysteme, die in vorgefertigte Säulensegmente eingebaut sind, minimiert. Dieser modulare Ansatz erhöht die strukturelle Robustheit und beschleunigt die Projektabwicklung erheblich, insbesondere bei Großprojekten. Der Schwerpunkt liegt auf der Schaffung schadensfreier Verbindungen, die starken Belastungen standhalten.
- Vorgefertigte Verbindungsdetails vereinfachen die Montage und verbessern die Effizienz vor Ort.
- Ingenieure setzen die Vorspanntechnik ein, um belastbare Verbindungen zu schaffen, was für Hochhäuser und Bauwerke in erdbebengefährdeten Regionen von entscheidender Bedeutung ist.
Einhaltung von Vorschriften und strukturelle Sicherheit
Die Einhaltung der Bauvorschriften ist von grundlegender Bedeutung, um die Sicherheit und Stabilität von Stützenverbindungen zu gewährleisten. Die geltenden Vorschriften schreiben vor, dass vertikale Verbindungen erheblichen Zugkräften standhalten müssen. Dies ist besonders wichtig für Bauwerke, die unfallbedingten Einwirkungen oder extremen Umweltbelastungen standhalten sollen und bei denen die Integrität der Säule nicht verhandelbar ist.
- Bauvorschriften wie EN 1991-1-7 und BS 5950-1 legen die grundlegenden Anforderungen für vertikale Verankerungen in Säulen fest.
- Richtig konstruierte Verbindungen gewährleisten, dass die Säule ihre Tragfähigkeit und strukturelle Integrität auch unter Belastung beibehält.
Optimierung der Gelenkplatzierung
Die Lage einer Konstruktionsfuge in einer Säule wirkt sich direkt auf die statische Leistungsfähigkeit aus. Aktuelle Best Practices konzentrieren sich auf die Positionierung von Fugen, um die Lastverteilung und die Gesamtintegrität des Systems zu verbessern. Diese strategische Platzierung trägt zu einer widerstandsfähigeren und haltbareren Endstruktur bei und steht im Einklang mit modernen Bauphilosophien, die sowohl der Effizienz als auch der langfristigen Leistungsfähigkeit Priorität einräumen.
- Das Anbringen von Fugen an den Unterseiten der Bodenplatten ist eine gängige und wirksame Strategie zur Verbesserung der Lastübertragung zwischen den Strukturelementen.
- Diese optimierte Platzierung ist eine Schlüsselkomponente des modularen Bauablaufs, bei dem sowohl die Projektgeschwindigkeit als auch die strukturelle Belastbarkeit im Vordergrund stehen.
Schlussfolgerung
Die korrekte Bestimmung der Radiusgrenzen, die Ausrichtung der Maserung und die Auswahl des richtigen Klebstoffs sind für die Verkleidung von gebogenen Strukturen von grundlegender Bedeutung. Diese Verlegetechniken gewährleisten eine dauerhafte, rissfreie Oberfläche, die den professionellen Standards für komplexe Oberflächen wie Säulen und gewölbte Wände entspricht.
Sehen Sie sich für Ihr nächstes Projekt die technischen Datenblätter mit detaillierten Spezifikationen an oder fordern Sie ein Musterkit an, um die Flexibilität des Materials aus erster Hand zu testen.
Häufig gestellte Fragen
Wie verkleidet man eine runde Säule?
Das Verkleiden einer runden Säule mit Steinfurnier erfordert ein flexibles Material. Stellen Sie zunächst sicher, dass die Oberfläche der Säule sauber, trocken und ordnungsgemäß grundiert ist. Messen Sie den Umfang und die Höhe der Säule, um die Furnierblätter zuzuschneiden. Tragen Sie einen hochfesten, flexiblen Klebstoff, z. B. einen Baukleber auf Polyurethanbasis, gleichmäßig auf die Rückseite des Furniers oder direkt auf die Säule auf.
Wickeln Sie das Furnier vorsichtig um die Säule und drücken Sie es fest an, um Lufteinschlüsse zu vermeiden. Verwenden Sie Spannbänder oder Malerband, um das Material sicher zu fixieren, bis der Klebstoff vollständig ausgehärtet ist, und bearbeiten Sie dann die Nähte wie erforderlich.
Verlegung von flexiblem Stein in Kurven?
Für die Verlegung von flexiblem Stein in Kurven ist die Vorbereitung des Untergrunds entscheidend. Der Untergrund muss sauber und stabil sein. Empfehlenswert ist ein hochklebriger, flexibler Baukleber. Tragen Sie den Kleber auf den Untergrund oder die Rückseite der Steinplatte auf.
Beginnen Sie mit dem Auftragen in der Mitte der Kurve und drücken Sie sie nach außen zu den Rändern hin, um einen vollständigen Kontakt zu gewährleisten und Luftblasen zu vermeiden. Bei engeren Radien kann es erforderlich sein, das Furnier mit einer Heißluftpistole leicht zu erwärmen, um seine Biegsamkeit zu erhöhen, wobei Sie stets die Richtlinien des Herstellers beachten sollten, um Schäden zu vermeiden.
Anleitung zum Biegen von Steinfurnieren?
Flexibles Steinfurnier ist so konzipiert, dass es sich auf natürliche Weise bis zu einem bestimmten Radius biegt. Um engere Kurven zu erzielen, ist eine kontrollierte Wärmeanwendung die Standardmethode. Verwenden Sie eine industrielle Heißluftpistole, um die Rückseite des Furnierblatts gleichmäßig über den zu biegenden Bereich zu erwärmen.
Dadurch wird das Harzbindemittel erweicht und das Material wird geschmeidiger. Biegen Sie die Platte langsam und vorsichtig um Ihre Form oder Ihren Untergrund. Der empfohlene Temperaturbereich und der Mindestbiegeradius müssen unbedingt im technischen Datenblatt des Herstellers angegeben werden, um Risse oder Verfärbungen zu vermeiden.
Klebstoff für gekrümmte Oberflächen?
Der beste Klebstoff für das Anbringen von Materialien auf gekrümmten Oberflächen ist ein Klebstoff, der sowohl eine hohe Anfangshaftung als auch eine langfristige Flexibilität bietet. Für Steinfurnier ist ein hochfester Polyurethan- oder Hybridpolymer-Baukleber der Industriestandard.
Diese Klebstoffe bieten eine hervorragende Haftung auf einer Vielzahl von Untergründen (Beton, Holz, Metall) und können kleinere Bewegungen oder Ausdehnungen und Schrumpfungen ausgleichen. Für stark beanspruchte Anwendungen oder Mauerwerk ist ein polymermodifizierter Dünnbettmörtel ebenfalls eine zuverlässige Wahl.
Ummanteln von Säulen mit Stein?
Die Ummantelung von Pfeilern mit Stein ist ein systematischer Prozess. Beginnen Sie mit einem sauberen, strukturell soliden Pfeiler. Verwenden Sie ein flexibles Steinfurnier, um auf gekrümmten Flächen beste Ergebnisse zu erzielen. Messen Sie das Furnier aus und schneiden Sie es zu, wobei Sie die Nahtausrichtung berücksichtigen. Tragen Sie einen geeigneten flexiblen Klebstoff, z. B. einen Polyurethan-Konstruktionskleber, auf den Pfeiler auf.
Drücken Sie das Furnierblatt fest auf die Oberfläche und wickeln Sie es straff ein. Sichern Sie das Furnier während des Aushärtungsprozesses, der in der Regel 24-48 Stunden dauert, mit Bändern oder hochfestem Klebeband. Behandeln Sie abschließend die Nähte mit einem farblich abgestimmten Fugenmörtel oder Dichtungsmittel, um ein monolithisches Aussehen zu erzielen.